> 之前不是在博客写了一篇文章嘛,写了一个关于Alist动态验证码的功能,访问Alist必须进行验证后才能进行访问,然后这个可能对小白不太友好,这里我写篇详尽文章教大家如何使用AList嵌入动态验证码 #### 准备工作 - 一台国内服务器 - 已备案域名 - 微信订阅号一个 #### 环境准备 > 搭建一个Web服务器环境是创建和维护网站的基础步骤。对于有经验的开发者来说,这个过程可能已经非常熟悉了。但对于那些刚开始接触建站的朋友,建议您先去看一下如何建站 #### 安装Node.js > Node.js是一个开源、跨平台的JavaScript运行时环境,它允许开发者在服务器端运行JavaScript代码,本程序后端就是基于Node.js编写的,如果您不了解Node.js 那您更应该仔细看这部分内容了 以我的 Debian系 主机环境为例 ##### 1,下载安装Node.js (18+版本均可) 下载地址:https://nodejs.cn/download/ 或者直接执行如下命令 ```bash wget https://npmmirror.com/mirrors/node/v20.18.0/node-v20.18.0-linux-x64.tar.xz ``` 下载完成后将 `node-v20.18.0-linux-x64.tar.xz` 解压到当前文件夹,会得到 `node-v20.18.0-linux-x64` 将`node-v20.18.0-linux-x64`文件夹移动到`/usr/local/node` 目录中,并重命名为`node` ##### 2,配置 Node.js 环境 编辑`/etc/profile` 文件 最底部添加如下内容 ```bash export NODE_HOME=/usr/local/node export PATH=$NODE_HOME/bin:$PATH ``` 保存之后执行 `source /etc/profile` 使其生效。 ##### 3,配置镜像加速 由于某些原因, npmjs.com 在国内的访问速度很不稳定。 所以我们可以考虑用国内的镜像网站地址替换,执行如下命令,配置为国内镜像源 ```bash npm config set registry https://registry.npmmirror.com ``` ##### 4,克隆仓库 我将这个项目的代码上传到了GitHub,可直接从github获取 地址:[Alist_Dynamic_verification: Alist AList嵌入动态验证码工具 (github.com)](https://github.com/geeklinux-io/Alist_Dynamic_verification) ##### 5,安装依赖 ```bash cd Alist_Dynamic_verification npm install ``` ##### 6,配置微信订阅号相关信息 编辑 `.env` 配置相关信息(后面配置也可以) ```bash WECHAT_APPID= WECHAT_SECRET= WECHAT_TOKEN= ENCODING_AES_KEY= PORT=4000 # 后端运行端口,对接微信 VERIFY_PORT=4001 # 验证接口的端口,对接前端验证验证码用的 # 端口可以不定义 默认就是上面那俩 ``` ##### 7,启动 ``` node run serve ``` ##### 8,配置反向代理 因为微信公众号强制要求使用HTTP/HTTPS端口,这里以Nginx为例,配置反向代理 我这里用了两个域名,例如; - test.example.com(用于对接微信公众平台) - verify.example.com(用于验证验证码的) nginx配置文件如下 test.example.com ```nginx server { listen 80; server_name test.example.com; return 301 https://$host$request_uri; } server { listen 443 ssl; server_name test.example.com; # SSL 配置 ssl_certificate /etc/ssl/certs/certificate.crt; ssl_certificate_key /etc/ssl/private/private_key.key; ssl_protocols TLSv1.2 TLSv1.3; ssl_ciphers HIGH:!aNULL:!MD5; location / { proxy_pass http://localhost:4000; proxy_set_header Host $host; proxy_set_header X-Real-IP $remote_addr; proxy_set_header X-Forwarded-For $proxy_add_x_forwarded_for; proxy_set_header X-Forwarded-Proto $scheme; } } ``` verify.example.com ```nginx server { listen 80; server_name verify.example.com; return 301 https://$host$request_uri; } server { listen 443 ssl; server_name verify.example.com; # SSL 配置 ssl_certificate /etc/ssl/certs/certificate.crt; ssl_certificate_key /etc/ssl/private/private_key.key; ssl_protocols TLSv1.2 TLSv1.3; ssl_ciphers HIGH:!aNULL:!MD5; location / { proxy_pass http://localhost:4001; proxy_set_header Host $host; proxy_set_header X-Real-IP $remote_addr; proxy_set_header X-Forwarded-For $proxy_add_x_forwarded_for; proxy_set_header X-Forwarded-Proto $scheme; } } ``` 二合一配置 ```nginx server { listen 80; server_name test.example.com; return 301 https://$host$request_uri; } server { listen 443 ssl; server_name test.example.com; ssl_certificate /etc/ssl/certs/certificate.crt; ssl_certificate_key /etc/ssl/private/private_key.key; ssl_protocols TLSv1.2 TLSv1.3; ssl_ciphers HIGH:!aNULL:!MD5; location / { proxy_pass http://localhost:4000/; proxy_set_header Host $host; proxy_set_header X-Real-IP $remote_addr; proxy_set_header X-Forwarded-For $proxy_add_x_forwarded_for; proxy_set_header X-Forwarded-Proto $scheme; } location /verify/ { # 将 /verify/ 路径的请求转发到 4001 端口 proxy_pass http://localhost:4001/; proxy_set_header Host $host; proxy_set_header X-Real-IP $remote_addr; proxy_set_header X-Forwarded-For $proxy_add_x_forwarded_for; proxy_set_header X-Forwarded-Proto $scheme; } } ``` ##### 9、公众号配置 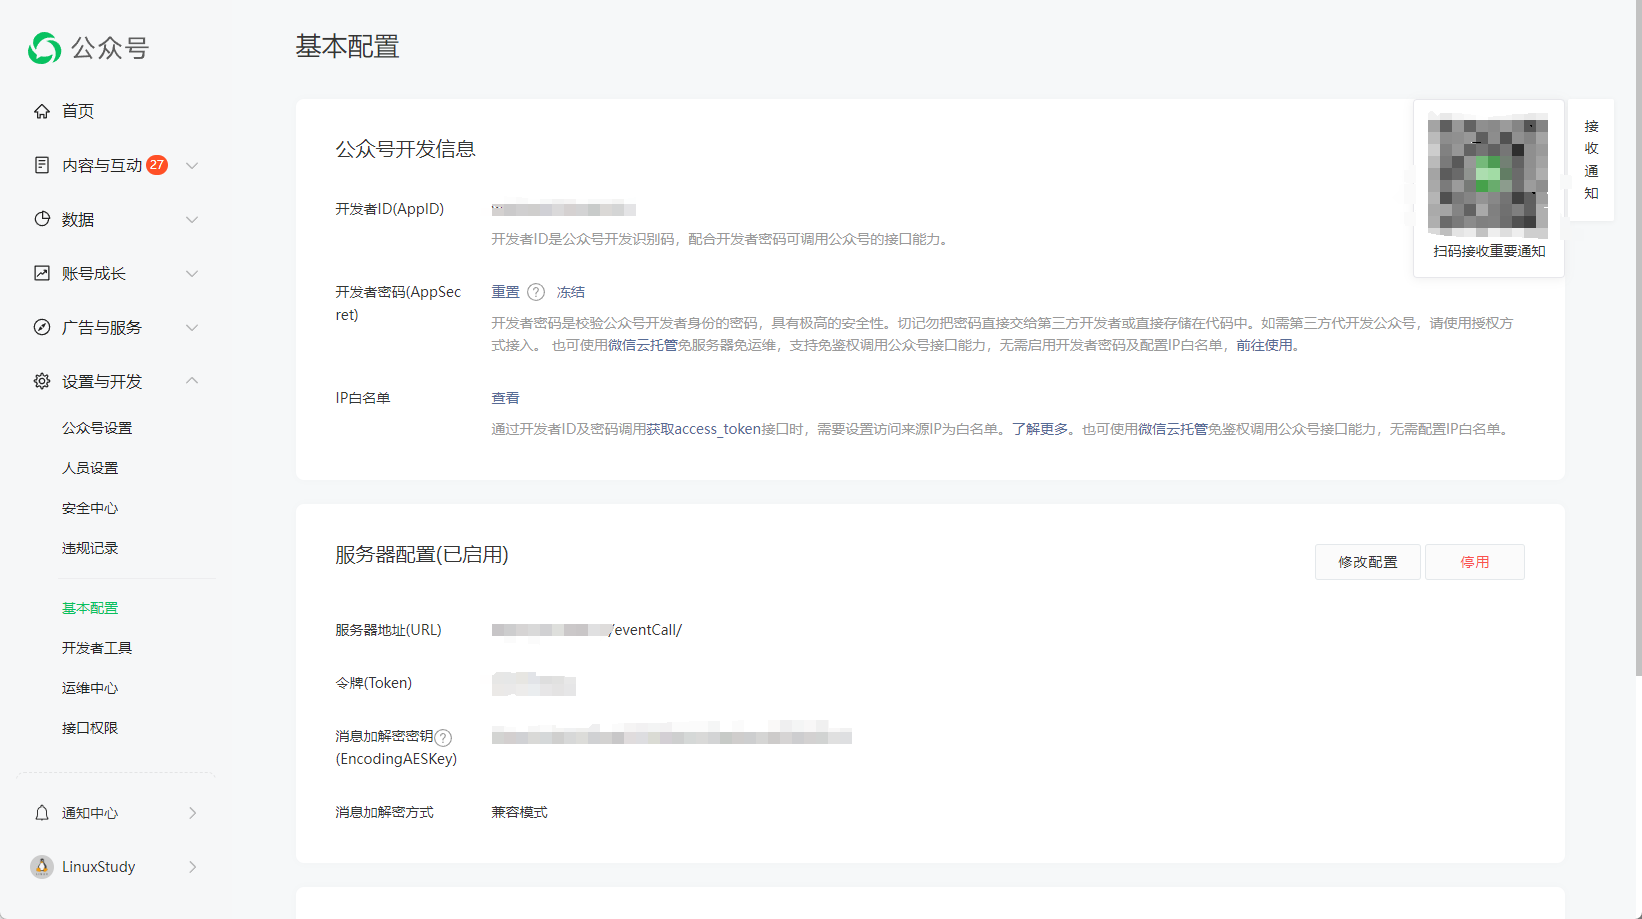 如上图所示,服务器地址(URL) 配置为 `http://你的域名.com/eventCall/`,并配置好其他参数即可 ##### 10,开机自动运行(systemd) 在`/etc/systemd/system/`目录创建一个service文件, 定义如下内容 ```ini [Unit] Description=Alist_Dynamic_verification After=network.target [Service] ExecStart=/usr/local/node/bin/npm run serve # npm全路径,按照你的安装位置修改 WorkingDirectory= # 你的项目目录 # Environment=NODE_ENV=production Restart=always [Install] WantedBy=multi-user.target ``` 完了 `daemon-reload`一下 `enable --now `运行服务就可以了 ##### Alist嵌入代码 ```javascript <script disable-devtool-auto src='https://cdn.jsdelivr.net/npm/disable-devtool'></script> <script src="https://unpkg.com/sweetalert/dist/sweetalert.min.js"></script> <script> document.addEventListener('keydown', function(event) { if (event.key === 'F12' || (event.ctrlKey && event.shiftKey && ['I', 'J', 'C'].includes(event.key.toUpperCase()))) { event.preventDefault(); } }); document.addEventListener("DOMContentLoaded", function() { promptPassword("success", "请输入验证码以继续访问"); }); // 验证验证码函数 function validateCaptcha(captcha) { const xhr = new XMLHttpRequest(); xhr.open("POST", "验证接口, true); xhr.setRequestHeader("Content-Type", "application/json"); xhr.onreadystatechange = function () { if (xhr.readyState === 4) { try { const response = JSON.parse(xhr.responseText); if (xhr.status === 200 && response.code === 200) { welcomeUser(); } else { swal("错误", response.msg || "验证码错误,请重试", "error").then(() => { promptPassword("error", "请重新输入验证码"); }); } } catch (e) { console.error("JSON 解析错误:", e); swal("错误", "响应格式不正确,请稍后重试", "error").then(() => { promptPassword("error", "请重新输入验证码"); }); } } }; xhr.send(JSON.stringify({ code: captcha })); } // 提示输入验证码的函数 function promptPassword(icon, title) { swal({ title: title, text: "请确认您已获取正确的验证码。请点击下方按钮关注我们的微信公众号以获取验证码。", closeOnClickOutside: false, icon: icon, buttons: { confirm: { text: "确认提交", value: "confirm", className: "custom-swal-button swal-button--confirm" }, getCode: { text: "微信公众号", value: "get_code", className: "custom-swal-button swal-button--copy" } }, content: { element: "input", attributes: { placeholder: "请输入验证码", type: "text", style: "width: 100%; padding: 10px; border: 1px solid #ccc; border-radius: 4px;" } } }) .then((value) => { if (value === '') { promptPassword("warning", "请输入正确的验证码"); } else if (value === "get_code") { showWeChatCode(); } else if (!/^\d{6}$/.test(value)) { promptPassword("warning", "验证码格式不正确,请输入6位数字"); } else { validateCaptcha(value); } }); } // 显示微信公众号二维码 function showWeChatCode() { swal({ title: "关注微信公众号获取验证码", text: "请扫描以下二维码关注我们的微信公众号以获取验证码。", icon: "info", closeOnClickOutside: false, content: { element: "img", attributes: { src: "公众号图片", style: "width: 100%; height: auto; border-radius: 4px;" } }, buttons: { confirm: { text: "返回输入", value: "confirm", className: "custom-swal-button swal-button--confirm" } } }).then(() => { promptPassword("info", "请输入验证码以继续访问"); }); } // 欢迎用户函数 function welcomeUser() { swal("欢迎!", { icon: "success", buttons: false, timer: 1000, //1秒后自动消失 }); } // 防止查看页面源代码 window.onbeforeunload = function() { return "您确定要离开此页面吗?"; }; // 检测并阻止右键菜单 window.addEventListener('contextmenu', function(event) { event.preventDefault(); }, false); // 检测并阻止选中文本 window.addEventListener('selectstart', function(event) { event.preventDefault(); }, false); </script> ``` Loading... > 之前不是在博客写了一篇文章嘛,写了一个关于Alist动态验证码的功能,访问Alist必须进行验证后才能进行访问,然后这个可能对小白不太友好,这里我写篇详尽文章教大家如何使用AList嵌入动态验证码 #### 准备工作 - 一台国内服务器 - 已备案域名 - 微信订阅号一个 #### 环境准备 > 搭建一个Web服务器环境是创建和维护网站的基础步骤。对于有经验的开发者来说,这个过程可能已经非常熟悉了。但对于那些刚开始接触建站的朋友,建议您先去看一下如何建站 #### 安装Node.js > Node.js是一个开源、跨平台的JavaScript运行时环境,它允许开发者在服务器端运行JavaScript代码,本程序后端就是基于Node.js编写的,如果您不了解Node.js 那您更应该仔细看这部分内容了 以我的 Debian系 主机环境为例 ##### 1,下载安装Node.js (18+版本均可) 下载地址:https://nodejs.cn/download/ 或者直接执行如下命令 ```bash wget https://npmmirror.com/mirrors/node/v20.18.0/node-v20.18.0-linux-x64.tar.xz ``` 下载完成后将 `node-v20.18.0-linux-x64.tar.xz` 解压到当前文件夹,会得到 `node-v20.18.0-linux-x64` 将`node-v20.18.0-linux-x64`文件夹移动到`/usr/local/node` 目录中,并重命名为`node` ##### 2,配置 Node.js 环境 编辑`/etc/profile` 文件 最底部添加如下内容 ```bash export NODE_HOME=/usr/local/node export PATH=$NODE_HOME/bin:$PATH ``` 保存之后执行 `source /etc/profile` 使其生效。 ##### 3,配置镜像加速 由于某些原因, npmjs.com 在国内的访问速度很不稳定。 所以我们可以考虑用国内的镜像网站地址替换,执行如下命令,配置为国内镜像源 ```bash npm config set registry https://registry.npmmirror.com ``` ##### 4,克隆仓库 我将这个项目的代码上传到了GitHub,可直接从github获取 地址:[Alist_Dynamic_verification: Alist AList嵌入动态验证码工具 (github.com)](https://github.com/geeklinux-io/Alist_Dynamic_verification) ##### 5,安装依赖 ```bash cd Alist_Dynamic_verification npm install ``` ##### 6,配置微信订阅号相关信息 编辑 `.env` 配置相关信息(后面配置也可以) ```bash WECHAT_APPID= WECHAT_SECRET= WECHAT_TOKEN= ENCODING_AES_KEY= PORT=4000 # 后端运行端口,对接微信 VERIFY_PORT=4001 # 验证接口的端口,对接前端验证验证码用的 # 端口可以不定义 默认就是上面那俩 ``` ##### 7,启动 ``` node run serve ``` ##### 8,配置反向代理 因为微信公众号强制要求使用HTTP/HTTPS端口,这里以Nginx为例,配置反向代理 我这里用了两个域名,例如; - test.example.com(用于对接微信公众平台) - verify.example.com(用于验证验证码的) nginx配置文件如下 test.example.com ```nginx server { listen 80; server_name test.example.com; return 301 https://$host$request_uri; } server { listen 443 ssl; server_name test.example.com; # SSL 配置 ssl_certificate /etc/ssl/certs/certificate.crt; ssl_certificate_key /etc/ssl/private/private_key.key; ssl_protocols TLSv1.2 TLSv1.3; ssl_ciphers HIGH:!aNULL:!MD5; location / { proxy_pass http://localhost:4000; proxy_set_header Host $host; proxy_set_header X-Real-IP $remote_addr; proxy_set_header X-Forwarded-For $proxy_add_x_forwarded_for; proxy_set_header X-Forwarded-Proto $scheme; } } ``` verify.example.com ```nginx server { listen 80; server_name verify.example.com; return 301 https://$host$request_uri; } server { listen 443 ssl; server_name verify.example.com; # SSL 配置 ssl_certificate /etc/ssl/certs/certificate.crt; ssl_certificate_key /etc/ssl/private/private_key.key; ssl_protocols TLSv1.2 TLSv1.3; ssl_ciphers HIGH:!aNULL:!MD5; location / { proxy_pass http://localhost:4001; proxy_set_header Host $host; proxy_set_header X-Real-IP $remote_addr; proxy_set_header X-Forwarded-For $proxy_add_x_forwarded_for; proxy_set_header X-Forwarded-Proto $scheme; } } ``` 二合一配置 ```nginx server { listen 80; server_name test.example.com; return 301 https://$host$request_uri; } server { listen 443 ssl; server_name test.example.com; ssl_certificate /etc/ssl/certs/certificate.crt; ssl_certificate_key /etc/ssl/private/private_key.key; ssl_protocols TLSv1.2 TLSv1.3; ssl_ciphers HIGH:!aNULL:!MD5; location / { proxy_pass http://localhost:4000/; proxy_set_header Host $host; proxy_set_header X-Real-IP $remote_addr; proxy_set_header X-Forwarded-For $proxy_add_x_forwarded_for; proxy_set_header X-Forwarded-Proto $scheme; } location /verify/ { # 将 /verify/ 路径的请求转发到 4001 端口 proxy_pass http://localhost:4001/; proxy_set_header Host $host; proxy_set_header X-Real-IP $remote_addr; proxy_set_header X-Forwarded-For $proxy_add_x_forwarded_for; proxy_set_header X-Forwarded-Proto $scheme; } } ``` ##### 9、公众号配置  如上图所示,服务器地址(URL) 配置为 `http://你的域名.com/eventCall/`,并配置好其他参数即可 ##### 10,开机自动运行(systemd) 在`/etc/systemd/system/`目录创建一个service文件, 定义如下内容 ```ini [Unit] Description=Alist_Dynamic_verification After=network.target [Service] ExecStart=/usr/local/node/bin/npm run serve # npm全路径,按照你的安装位置修改 WorkingDirectory= # 你的项目目录 # Environment=NODE_ENV=production Restart=always [Install] WantedBy=multi-user.target ``` 完了 `daemon-reload`一下 `enable --now `运行服务就可以了 ##### Alist嵌入代码 ```javascript <script disable-devtool-auto src='https://cdn.jsdelivr.net/npm/disable-devtool'></script> <script src="https://unpkg.com/sweetalert/dist/sweetalert.min.js"></script> <script> document.addEventListener('keydown', function(event) { if (event.key === 'F12' || (event.ctrlKey && event.shiftKey && ['I', 'J', 'C'].includes(event.key.toUpperCase()))) { event.preventDefault(); } }); document.addEventListener("DOMContentLoaded", function() { promptPassword("success", "请输入验证码以继续访问"); }); // 验证验证码函数 function validateCaptcha(captcha) { const xhr = new XMLHttpRequest(); xhr.open("POST", "验证接口, true); xhr.setRequestHeader("Content-Type", "application/json"); xhr.onreadystatechange = function () { if (xhr.readyState === 4) { try { const response = JSON.parse(xhr.responseText); if (xhr.status === 200 && response.code === 200) { welcomeUser(); } else { swal("错误", response.msg || "验证码错误,请重试", "error").then(() => { promptPassword("error", "请重新输入验证码"); }); } } catch (e) { console.error("JSON 解析错误:", e); swal("错误", "响应格式不正确,请稍后重试", "error").then(() => { promptPassword("error", "请重新输入验证码"); }); } } }; xhr.send(JSON.stringify({ code: captcha })); } // 提示输入验证码的函数 function promptPassword(icon, title) { swal({ title: title, text: "请确认您已获取正确的验证码。请点击下方按钮关注我们的微信公众号以获取验证码。", closeOnClickOutside: false, icon: icon, buttons: { confirm: { text: "确认提交", value: "confirm", className: "custom-swal-button swal-button--confirm" }, getCode: { text: "微信公众号", value: "get_code", className: "custom-swal-button swal-button--copy" } }, content: { element: "input", attributes: { placeholder: "请输入验证码", type: "text", style: "width: 100%; padding: 10px; border: 1px solid #ccc; border-radius: 4px;" } } }) .then((value) => { if (value === '') { promptPassword("warning", "请输入正确的验证码"); } else if (value === "get_code") { showWeChatCode(); } else if (!/^\d{6}$/.test(value)) { promptPassword("warning", "验证码格式不正确,请输入6位数字"); } else { validateCaptcha(value); } }); } // 显示微信公众号二维码 function showWeChatCode() { swal({ title: "关注微信公众号获取验证码", text: "请扫描以下二维码关注我们的微信公众号以获取验证码。", icon: "info", closeOnClickOutside: false, content: { element: "img", attributes: { src: "公众号图片", style: "width: 100%; height: auto; border-radius: 4px;" } }, buttons: { confirm: { text: "返回输入", value: "confirm", className: "custom-swal-button swal-button--confirm" } } }).then(() => { promptPassword("info", "请输入验证码以继续访问"); }); } // 欢迎用户函数 function welcomeUser() { swal("欢迎!", { icon: "success", buttons: false, timer: 1000, //1秒后自动消失 }); } // 防止查看页面源代码 window.onbeforeunload = function() { return "您确定要离开此页面吗?"; }; // 检测并阻止右键菜单 window.addEventListener('contextmenu', function(event) { event.preventDefault(); }, false); // 检测并阻止选中文本 window.addEventListener('selectstart', function(event) { event.preventDefault(); }, false); </script> ``` Last modification:April 25, 2025 © Allow specification reprint Support Appreciate the author Like 如果觉得我的文章对你有用,请随意赞赏